Mirrors can be installed with wall anchors, french cleats, mirror clips, or mirror mastic. They can be hung against the wall or away from the wall with or without LED lighting. This post explains all you need to know about installing the five main types of residential mirrors:-
As an Amazon Associate, I earn from qualifying purchases.
Framed Wall Mirrors
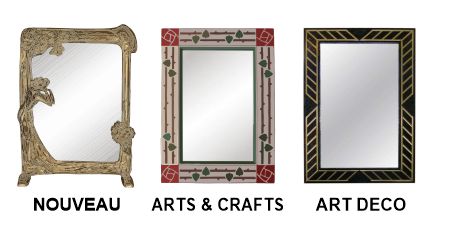
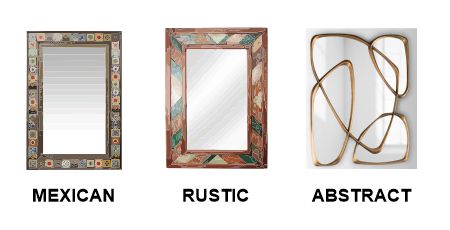
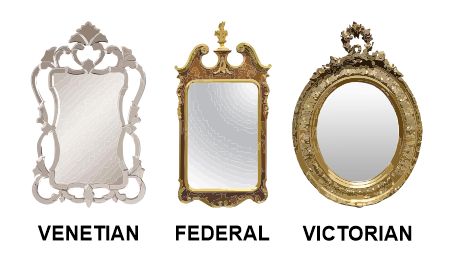
Framed mirrors give the widest scope for interior design harmonization. Mirrors can be framed in a wide variety of styles from Art Nouveau, Art Deco, Contemporary, Chippendale, Chinese, Baroque, Mexican, Rustic, Abstract, Venetian, Federal, Victorian, and many others.

Framed mirrors can be used to beautify and improve your entire home. They bring light into rooms and make narrow spaces and hallways look wider. They can accentuate a chandelier or make a classic statement over a traditional fireplace. Mirrors also play a part in Feng Shui as they represent water – they will brighten a dingy den and can be personalized by etching and painting to commemorate a favorite event or team.
Framed mirrors can be beveled or plain. Beveled mirrors add elegance to traditional frame styles like Victorian, Venetian, and Federal but are not recommended for simples rustic or arts and crafts mirrors or contemporary/abstract frames.
Two positions for dining room mirrors
For traditional dining rooms, the two best positions for wall mirrors are either opposite the sides of the table (you choose the wall) or at the head of the table. Use this page for more info.
Framed mirrors in bathrooms
Framed mirrors are have also recently become popular for practical purposes in bathrooms where previously, throughout the 1990s and 2000s, a large frameless mirror stretching across the double sinks was the most popular bathroom solution. Now, individual framed mirrors bring style and elegance into the bathroom.


A great benefit with the new trend towards framed bathroom mirrors is that they can easily be taken down and changed as your tastes evolve. This is in contrast to single, unframed mirrors that are glued to the wall with mastic and are very difficult to remove. This is especially problematic if such a mirror becomes scratched or cracked.
How to hang framed mirrors
Framed mirrors are hung in the same way as picture frames – except that, generally speaking, a framed mirror is likely to be heavier and so will need extra-strong supports. In order of strength the recommended installation methods are
- French Cleats (for heaviest mirrors)
- Double-wall anchors
- Single wall anchors (for lightweight mirrors)
How to hang a mirror with french cleats
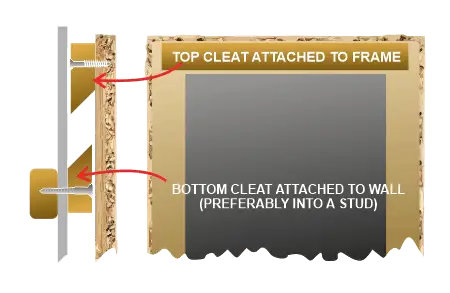
French cleats are used for attaching heavy objects like cabinets as well as mirrors and picture frames to walls. They are traditionally made with wood molding cut at a 45 or 30-degree angle but are now available in a variety of lengths made from aluminum or steel (see below). The great benefit is that the lower cleat (attached to the wall) can be secured to wall studs for exceptional strength.

If you do not have a table saw and cannot make your own wooden cleats, Aluminum Cleats are available in numerous different lengths – suitable for hanging any size of heavy framed mirror or picture frame.
How to hang a framed mirror with wall anchors
Most moderately heavy mirrors can be hung using steel wire (sometimes called piano wire) attached to special “D” rings that are screwed into the frame as shown below. The safety of the installation depends almost entirely on the strength of the wall anchor and future posts will cover anchors in detail. Everything else being equal, it is always best to attach the anchor to a wooden stud behind the drywall. Where this is not possible, two wall anchors provide more safety than just one.
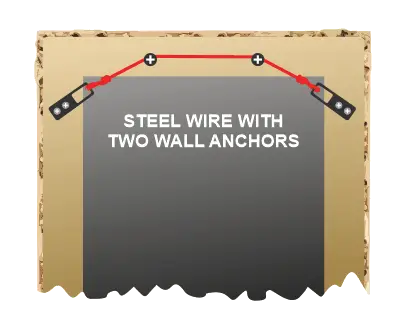
Two-wall anchors provide greater security than one and also permit the easy leveling of the mirror.

With only one wall anchor, it is slightly more difficult to finesse the mirror to get it exactly level.

“D” rings hooked on to two wall anchors
This method requires very accurate placement of the wall anchors to ensure the mirror is level on the wall – but with well-secured anchors is a very safe installation method.
Frameless wall mirrors
Purely functional and uncluttered, a frameless wall mirror has long been the modern choice for the contemporary bathroom. Frameless mirrors usually are plain but may be beveled for an extra decorative look.
There are two choices when it comes to hanging frameless mirrors. They can be installed either against the wall, with clips or adhesive, or away from the wall with standoffs for a more modern and interesting look.
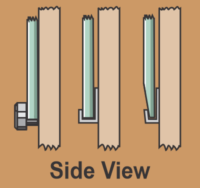
Frameless mirror attached flush with the wall using clips or J-channel with or without adhesive.
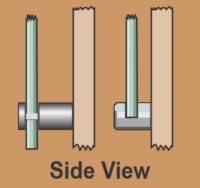
Frameless mirror attached away from the wall using stand-offs (left) or edge-grips (right)
How to hang a frameless mirror flush with the wall
1) How to hang a small frameless mirror
If you have a small frameless mirror, the Andscott company has invented a neat and simple method to hang it. We recommend this for mirrors weighing 12 lbs or less – that is for 1/4″ thick mirrors about 24″ square, or 24″ * 30″ for a 3/16″ thick mirror.
“Hang-it” mirror hangers: make sure the mirror is perfectly clean: apply the mirror hanger and allow the adhesive to achieve full strength overnight before hanging, Call the Andscott company for details – they will need you to send them a check.
2) How to hang large frameless wall mirrors
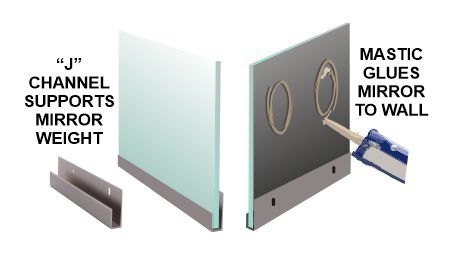
The two main ways to attach a large frameless mirror to the wall are to use either mechanical methods (clips or J-channel) or adhesive methods (mirror mastic). Most professionals use a combination of the two methods for extra safety.
How to hang mirrors with adhesive (mastic)

RED ALERT: Mirror and glass are dangerous and even life-threatening when installed incorrectly. Artistry in Glass cannot be liable for actions taken based on advice given on this site. Always consult a licensed professional when hanging large mirrors.
The traditional way to hang large wall mirrors is to use a kind of adhesive called mastic. The original mastic used by glass companies is a black, tarry material produced as a by-product or residue from petroleum refining. It is yucky to look at and handle but it will not damage the silvering of the mirror (see the warning below).

IMPORTANT WARNING: Do not use silicone, regular caulking, or adhesives to glue your mirror to the wall. These glues will damage the silvering and eventually result in black spots.

Numerous brands of mastic are available: we use CS-4300 but others are equally effective – just check the tube to be sure the adhesive is suitable for mirrors. If you use silicone the adhesive will eventually eat through the silvering and form black spots on the mirror.

If you are planning to install a large number of mirrors (for example: a wall of mirrors in a home gym), it is more economical to use professional mastic in one gallon cans. Instructions will be given in a future post – just be aware that some homeowners have complained about the tarry odor that persists for a day or so while the mastic sets up.
How to apply mirror mastic – tips and tricks
For the safe attachment of mirrors follow these steps when using mirror mastic:
Prepare the wall surface
To ensure the mastic sticks to the wall, the surface must be clean and free from dirt or grease. If the wall is painted the best approach is sanding with coarse (#80 grit) sandpaper. With raw sheetrock or plywood, it’s advisable to apply primer
Surfaces must be clean, fully dry and free from dust, dirt, grease, loose or powdery paint or primer. Never apply to new plaster or a freshly painted wall. The adhesive is not compatible for use on wallpaper or vinyl safety-backing.
Make sure glass or mirror is clean, completely dry and both the glass and adhesive is room temperature prior to application. Do not use in temperatures lower than 40° F. • Cures rapidly to reach optimum strength within 7 – 14 days, full cure 21 days
For safest mirror installation use mechanical supports as well as adhesive
When gluing mirrors to a wall it is always best to use mechanical supports as well as adhesive. In the case of large mirrors, the best support system is an aluminum extrusion called a J-channel that is available in numerous finishes to match your décor.

Aluminum J-channel (here shown in brushed nickel) is also available in polished chrome, satin anodized, and black to match your interior design. The seller will contact you and request you to let them know how to cut 12-foot long channel to around half the length for shipping by UPS.
Installing a frameless beveled mirror
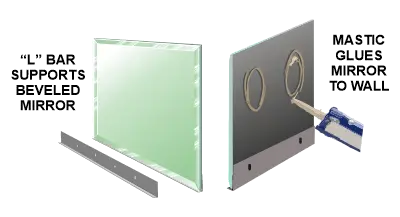
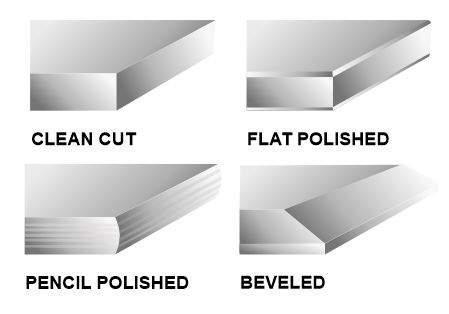
The standard J-channel is ideal for supporting mirrors with seamed or flat polished edges. However, if you have gone to the expense of buying a beveled mirror, the bevel will be partly hidden in the channel, so experts recommend using an L-bar instead.
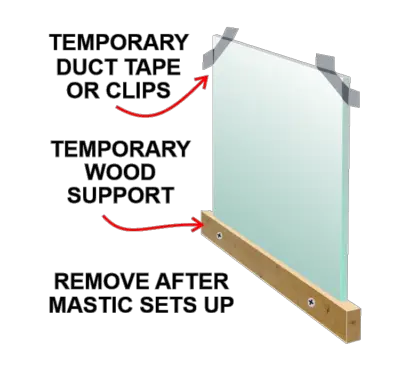
Important L-bar security warning!
Your mirror must be secured to the wall with temporary wooden or metal clips while the mastic (adhesive) sets up. If the mirror is not braced against the wall, at the top and bottom, it is very likely that it will slip off the L-bar while left to dry overnight. This may result in a broken mirror and seven years of bad luck (not really – this is just a superstition!).
How to guard against “black-edge” on your mirror
In humid or damp conditions water will eventually damage the back of the mirror and produce an unsightly “black-edge” where the silvering has failed. This is especially common in mirrors over the bathroom vanities.

Use a sealer to prevent “black-edge”
We recommend Mirror Edge Sealant by C R Laurence to protect your beveled or polished mirrors against black-edge. The sealant sprays on clear to seal mirror edges after cutting, seaming, or polishing. Edge Sealant provides long-lasting protection against moisture and other harmful conditions.
Removing a wall mirror
A frameless wall mirror attached with adhesive or mastic can be a challenge to remove safely. Follow the steps in this useful guide for the best results.
3) How to hang a mirror with clips
Mirror mastic (adhesive) is an excellent way to safely secure large mirrors against a wall. However, a major problem occurs if you later want to remove the mirror because mirror mastic is hard to detach. For this reason, mechanical supports (mirror clips) are a good option – especially for smaller mirrors. Read this special post for everything you need to know about mirror clips.
What are the main types of mirror clips for wall mirrors?
There is a very large variety of mirror clips ranging from strictly functional to highly decorative, and having a corresponding price variation from inexpensive to expensive. To help you choose, we divide clips into three main categories:
- Functional clips – with visible screws.
- Functional clips – with hidden screws.
- Decorative clips – with hidden screws.
Functional clips with visible screws.
The easiest clips to install are those with the screws accessible to screw in, above and below the mirror. In all examples of clips remember that the entire weight of the mirror is supported on the lower clips. The top ones merely stop the mirror from rotating away from the wall.
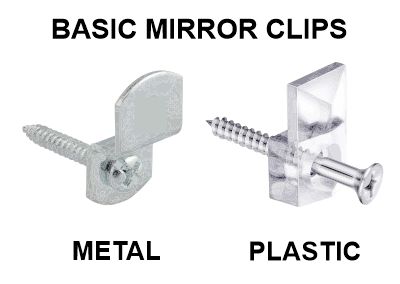
Although the simple clips shown above are perfectly functional, the appearance is offensive to the knowledgeable viewer because the attaching screw is visible and therefore the clips detract from the simple outline of the mirror. These are OK for a service station restroom but they don’t look good. As a solution, ingenious inventors have designed clips with hidden screws:
Functional clips with hidden screws.
It is no problem to hide the mounting screw on the important, weight-bearing bottom clips – the issue if how to conceal the screw in the top clip. Designers have approached the problem of hiding the mounting screws behind the mirror in at least four ways.
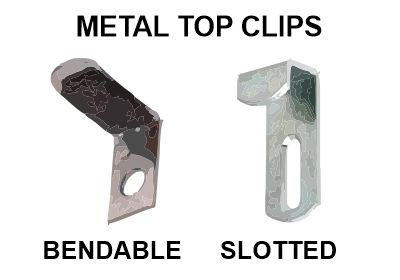
The simplest top-clip solution is to bend the flexible metal down over the mirror. The slotted solution (above right) works by making sure the attaching screw is not too tight to prevent the entire clip to be pushed down behind the mirror.
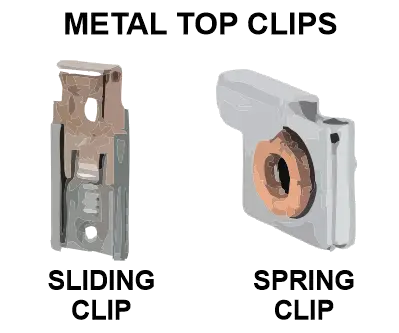
More complicated top-clip solutions are the moveable cap (left) that is pushed down to secure the mirror, and the spring-loaded clip that springs down to catch the top of the mirror.
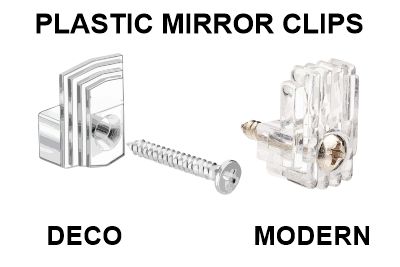
Decorative clips with hidden screws.
For a designer, decorator look mirror clips should be available in a variety of finishes to match bathroom hardware. The commonest finishes these days are brushed nickel, polished chrome, satin chrome, and brass. The second quality for a decorator-grade mirror clip is that the attaching screws should be hidden. Two inventive designs are shown below:
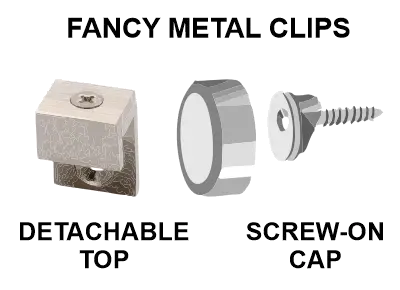
Two innovative ways to hide the screws in mirror clips are the detachable top-clip type shown above left and the screw-on cap clip (above right).
The top clip type is available in brushed nickel, brass, or polished chrome and comes in two styles – square for polished edged mirrors and angled for beveled edge mirrors.
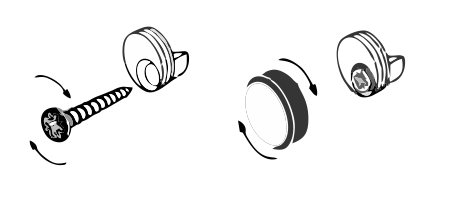
The second type of decorative clip uses an ingenious cap to conceal the screw. The clips are attached to the wall, the mirror is rested on the clips and secured by the screw-on circular caps.

CRL Brushed Nickel Round Mirror Clips
- 3/4″ (19 mm) Diameter Clips for Use with 1/4″ (6 mm) Mirror
- Available in Three Finishes
- Supplied with #8 x 1-1/4″ (32 mm) Wood Screws and Anchors
- 4 Clips per Set
How to install mirrors away from the wall
Additional drama and interest can be generated by “floating” your mirror away from the wall. A completely different and more interesting look can be achieved by using the following methods:
- Deluxe lighted and anti-fog mirrors
- Custom wood-backed mirrors
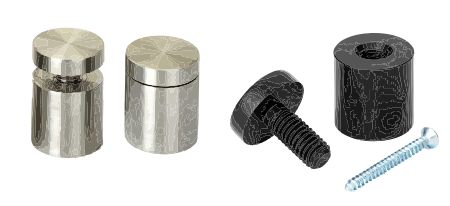
- Edge-grip standoffs
- Drilled standoffs
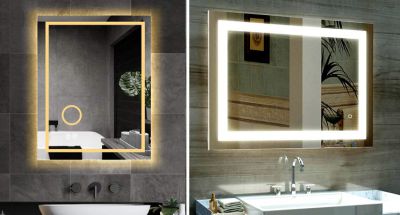
Deluxe lighted mirrors
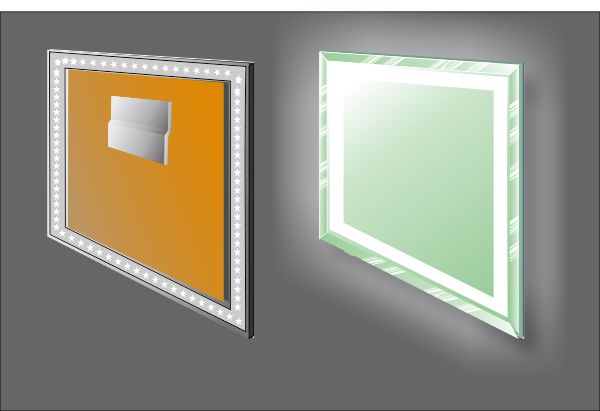
If money is no object, there are a number of stylish away-from-the-wall mirrors that come in rectangular and circular shapes and various dimensions. An additional benefit of “away-from-wall” mirrors is that the space behind the mirror can be used to conceal LED lighting and anti-fogging devices. The lighting is a very elegant and useful feature that may outline the border as in the examples below:
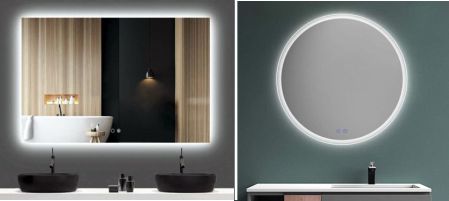
Alternatively, the mirror may be specially designed with the opaque silvering removed to leave frosted areas for the light to shine through as in the examples below:

36 x 28 Inch LED Vanity Mirror Anti-Fog Wall Mounted Mirror with Light
Available in several sizes: the brightness of the mirror is dimmable, controlled with a touch button. A built-in anti-fogging function means no need to constantly treat your mirrors with fog-free spray, or rinse them multiple times per shower.
Custom wood-backed mirrors
If you are on a budget and do not want to spend $200+, you can build your own away-from-the-wall mirror simply by attaching a sheet of plywood or MDF to the back of your mirror. The benefit of this method is that you can make the mirror exactly the right size for own bathroom.
Order a 1/4″ thick clear mirror from your local glass company and specify a “flat-polished” or even a beveled edge. Then, attach a sheet of 3/4″ thick MDF to the back, making sure to use mastic or mirror adhesive.
The 3/4″ thick material will give a pleasing separation between the mirror and the wall – and you can hang the mirror with french cleats or wall anchors
Innovative and handy home-owners can even add their out LED ribbon lights to the back to produce an amazing lighted bathroom.
How to hang a mirror away from the wall with edge-grips or standoffs

The benefit of edge-grips is that they do not require holes to be drilled in the mirror but the downside is that all the weight is supported on the two lower grips so they are not so secure as stand-offs for large (more than 48″ wide) heavy mirrors. Read on for details:
How to hang a mirror with edge-grips (side clamps)
An attractive, modern look can be achieved by hanging your mirror an inch or so away from the wall using edge-grips otherwise known as side clamps.
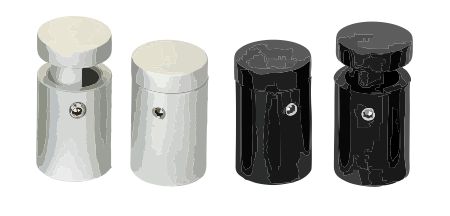
The simplest way to attach a mirror away from the way – side clamp standoffs do not require you to drill holes in the mirror. This saves fabrication costs and helps the home-owner to use any mirror that you have available. The downside of edge-grips is that the entire weight of the mirror is supported on the lower supports. This means that larger mirrors (> 30″ square) will need more than two supports along the bottom. More details will be available in future posts.
How to hang a frameless mirror using stand-offs
The safest way to hang a large heavy mirror away from the wall is to use standoffs attached through holes drilled in the mirror. This is because the weight is distributed over all the supports (top as well as the bottom). The skilled installer will decide how many standoffs are required to support the weight of large mirrors but six is generally adequate for even the largest mirror providing the supports are anchored firmly.
One caution is that, although the mirror may be securely attached, it nevertheless might flex or bend when pushed on from the front, if the standoff spacing is too wide. Always consult a licensed professional when installing heavy mirrors and see future blog posts for more advice.
How to install tilting and swinging mirrors
The major benefit of a tilting mirror is that it can adjust easily to suit people of widely varying heights – from children and wheel-chair users to tall basketball players.
Tilting mirrors have the tremendous practical benefit of adjusting for people of varying heights. Many female owners also cite the psychological benefit of a down-tilted view in improving their body image by making them appear slimmer.
Numerous stylish tilting mirrors are available and some of our favorites are shown below:

TEHOME 27 x 35 inch Farmhouse Large Black Metal Framed Pivot Rectangle Bathroom Mirror

Hamilton Hills Large Pivot Rectangle Mirror with Oil Rubbed Bronze Wall Anchors
If you already have a favorite mirror – perhaps of the ideal size for your bathroom – you can convert this into a tilting mirror by purchasing tilting clamps:

Hamilton Hills Square Brushed Gold Pivot Mirror Hardware Tilting Anchors for Mirror or Picture Glass or Plexiglass. SAFE AND EASY TO INSTALL: these authentic new pivot clamps tightly secure to the included metal plates that stick to the back of your mirror plate.
Tilting mirrors are easy to install – just follow the instructions but make sure to use strong anchors or, better still, arrange to screw into a stud.
How to choose and install swinging mirrors
Swinging mirrors are the ultimate in bathroom luxury and convenience. When positioned correctly, and in conjunction with a mirror in front, they enable the viewer to see the front and back of her head at the same time.
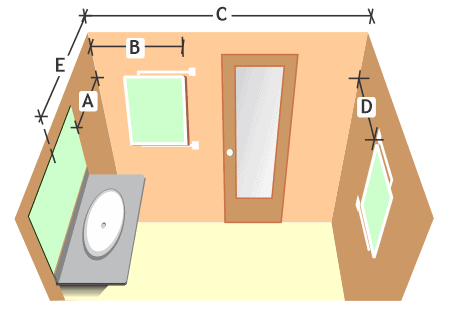
The swing mirror can be installed either on a sidewall to the left or right of the vanity or on a wall opposite the vanity mirror. Check these dimensions: if distance A is 15 inches or less, the mirror can be installed on a sidewall (distance B should be not less than 22 inches (24-26″ is optimal). If distance C is 72 inches or less the mirror can be installed on a rear wall. (for best results, distance D should be approximately equal to E.

CRL Chrome 14″ x 22″ Pivot-N-View Mirror
It is almost infinitely adjustable and provides the user with full back and side views. Available in brushed nickel or chrome finishes and two sizes.
4) How to install dresser mirrors
Dresser mirrors are a slightly old-fashioned but still popular accessory to the traditional bedroom dresser. Our commonest request for supports comes from customers who have dismantled the supports when moving house and have lost part or all of the hardware during the move.
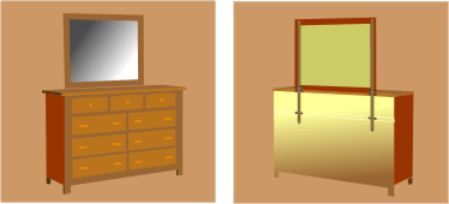
Our recommended source for dresser mirror supports is the Garrett Mirror Support Company located in Statesville NC. Their supports are heavy-duty, US made and come in two sizes – 48″ long for small mirrors and 60″ long for large mirrors. Be aware that the supports are shipped in long tubes that occasionally get bent in the UPS or FEDEX sorting machines. Call the company in case of damage – they will arrange a return label and ship you a replacement.
5) Magnifying Mirrors
Advances in LED lighting and mirror technology mean that there are numerous inexpensive options for make-up mirrors.
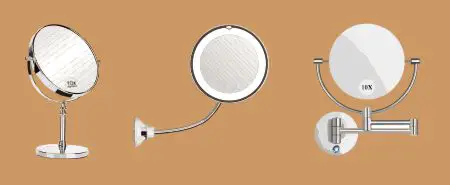
All newer makeup mirrors come with plain and magnifying (generally 10X) sides and many include built-in LED lights for perfect visibility. The convenience and affordability make these products an essential part of the modern women’s bathroom.

Professional 8.5″ Lighted Makeup Mirror, 10X Magnifying Vanity Mirror with 32 Medical LED Lights – one of our favorite, deluxe makeup mirrors. Not only a professional makeup mirror, it can also be used as a desk lamp, night light, and ambient light source.
Look for future blog posts in this series
Future posts will explain all you need to know to safely install all types of wall mirrors. Do not forget that Artistry in Glass is also expert in the repair and restoration of antiques and collectibles.
As an Amazon Associate, I earn from qualifying purchases.
Unique Mirror Resources from Artistry in Glass
Mirror Installation & Removal
- How to hang a wall mirror
- How to frame a builder’s grade bathroom mirror
- How to hang a frameless mirror with glue
- Best clips for hanging mirrors
- How to attach a mirror to a closet door
- How to remove a mirror glued to the wall
Mirror Repair & Restoration
- Should I resilver my antique mirror?
- Can I repair scratched mirror silvering?
- What is the best spray paint for mirror silvering?
- How to fix a cracked mirror
- How to repair a broken mirror frame
Amazing restoration services:
- How to repair a broken china plate
- How to repair a broken mirror frame
- How to repair a broken china teapot
- How to fix a broken marble slab
- How to repair a broken china coffee mug
- All about repairing stained-glass lampshades
- How to care for your stained glass skylight
- Is stained glass worth repairing?
- To repair or toss out?
- Tucson crystal & china repair a division of Artistry in Glass
- What to do with broken antiques
- Can I repair scratched mirror silvering?